A fast and effective way to add correction exercises to your client’s care.
Correcting biomechanical imbalances is a great way to improve the quality of the services to your clients.
Your responsibility:
To identify dysfunctional patterns and painful patterns on your examination.
This can be done in two minutes
Here is a brief description of how you can start offering these services to your clients the very first day you get your Phoenix Waveform.
We are not here to reinvent the wheel. So, we are not going to teach you an entirely new program. Gray Cook has a great program called “The Functional Movement Screen”. I suggest you get certified in his program.
The simplest way to start offering corrective exercises to your clients is to use Gray’s program in addition to the Phoenix Waveform.
- Functional Movement Exam
- Mobility Work With Phoenix Waveform On Muscles Based on Exam
- Muscle Activation With Phoenix Waveform
- Exercise Progression
- Re-Test Functional Movement Screen to monitor Progress
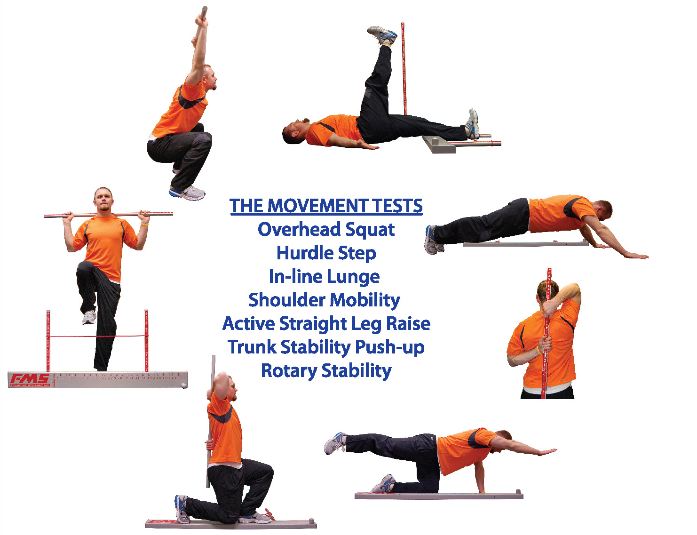
1st Preform the Functional Movement Screen on your clients
Take a picture or video of your clients doing each movement then compare their picture to the pictures in the manual.
Here is how to do the FMS: FMS Testing Functional Movement Screen
Here is the scoring sheet: FMS Score Sheet
Gray has done a great job on the mobility and exercise progressions, so we will follow the same progression and just add a few things.
Here is the movement screen manual: Functional Movement Screen Manual
The corrective exercises involve mobility work and then exercises.
MOBILITY WORK: For the mobility work FMS suggests foam rolling, stick work, and stretching. We are going to use the Phoenix Waveform and the reason we are is that we want to cause the muscle to contract, then take it through an eccentric (lengthening while the muscle is also contracting) motion. Which will likely produce more dramatic results than foam rolling or stick work.
EXERCISES: We are going to follow the same exercise progression as Gary created, however, we are going to add muscle activation and neurological feedback with the Phoenix Waveform. We will put the electrode pads on the muscles while the clients do the exercises.
Basic Corrective Exercise Program
Mobility Work: Attach the electrode pad to the belly of the muscle then have the clients take the muscle through full Active Range of Motion. Depending on the client, you may want to assist the client through the full range of motion by stretching them.
When the client fails the movement test, do the mobility on the muscles listed below: Attach the electrode pad to the belly of the listed muscle and take it through a full range of motion 8 times.
Hurdle Step: Glut Max, Glut Min, Glut Med, TFL, Quads, Psoas
Straight Leg Raise: Psoas, Hamstring, Calf
Shoulder Mobility: Pect Major/minor, Teres Major, Upper Trap, Back
Truck Stability Push-Up: Psoas, Lower Back
Rotary Stability: Lower Back, Glut Max, Glut Med TFL
In-Line Lunge: Calf, Ant Tib, Quads, Glut Min, Glut Max, Lat Dorsi, Lower Back
Deep Squat: Lasts, Lower Back, Glut Max, Glut Min, Glut Min, Glut Med, Adductors, Calf
Muscle Activation
Here are seven neuromuscular activation routines you can do before every workout or race to help you. These only need to be done a couple of times each, for brief periods of 5 to 7 seconds. That means you can run this whole routine in less than 2 minutes. Short and effective!
1. STORK: Electrode Pad inside ankle. Use wire splicer place on pad lateral to T1 then over the pect. Do Bilaterally
Standing on one leg, balance so the rest of your body is as perpendicular to the ground as possible, nice and straight, with your arms spread out. Hold this position for 5 to 7 seconds on each foot, once or twice through each foot. Chances are, your balance will be greatly challenged, more than you expect for such a simple movement, proving the need for the exercise. For an additional challenge, do this exercise with your eyes closed.
2. BEAR CRAWL
Crawling on the ground, on hands and feet, with butt down, is probably one of the best activation exercises you can do. It forces the shoulders, arms, and chest, to stabilize the upper body, the core to be engaged in connecting the legs and upper body, and of course, the legs are driving the body forward. Simply doing this for about 15 feet is an effective activation technique.
3. SINGLE LEG BALANCE AND LEAN
With arms lifted up and behind your ears, activate your core and lean back while standing on one foot, and pointing the other foot in the same angle of the upper body. If you do this correctly, you will find your stomach tensing up, and likely your whole body shaking. Do this for both feet, holding 5 to 7 seconds on each foot, twice through. For an additional challenge, do this exercise with your eyes closed.
4. KNEE LIFT AND BACK
This exercise activates the hip flexors, the quad, the hamstring and the glutes. Lifting the knee at a 90-degree angle, hold it up front for about 5 seconds, then while maintaining the 90-degree bend of the knee, shift it back so the glute and hamstring pull to hold it in position. Do this for each leg, twice through.
5. CALF RAISES
Standing in place, simply raise up onto your toes, twisting or pivoting on your toes to shift your ankles and heels outward, then back inward, then bring your feet back down to the ground fully, in about 3 to 4 seconds for the full cycle. Again, 5 to 7 routines of this will be adequate.
6. LAT PULL-DOWNS
Standing in place, simply lift your hands up and pretend to pull down on a bar. Five to 7 routines of this, feeling the lats activate is adequate.
7. CRISS-CROSS ARMS
Standing with your arms extended out to your sides and the palms facing up, bring them all the way across the front of your body with palms facing down. For additional challenges, do this while standing on one leg instead of two, with the free leg hanging, slightly bent.
Exercise Program
Now that the muscles are activated, do the exercise progression that is associated with the failed movement test.
Here are the exercise progressions based on the specific movement test:
Here is a PDF and images of the exercises:FMS EXERCISE PROGRESSION
Deep Squat Corrective Exercises
Partner Stretch Prone Quad Stretch
Wall Sit
Dorsiflexion Stretch
Hurdle Step
Partner Prone Hip Flexor
Stretch Stride with Hip External Rotation
Stride Stretch with/without Spinal Rotation
In-line Lunge
Partner Thomas Test Stretch
Gastroc/Soleus Stretch
Latissmus Dorsi/External Rotation Stretch
Leg Lock Bridge
Shoulder Mobility
Partner Traction w/ Int/Ext Rotation Wall Sit with Shoulder Press
Active Straight Leg Raise
Partner Straight Leg Raise Single Leg Lowering Progression
Trunk Stability Push-Up
Incline Push-up
Push-up Walkout
Rotary Stability
Bilateral Hip Flexed Rotation Abd/Add.
Hip Flexed Torso Rotation
Rolling